Using Git with GitHub on Windows
If you’re new to Git and don’t know how to install Git on Windows, read my earlier post: How to Setup Git for Windows
In an earlier post, I described the preliminary steps required to work with git on CodePlex. However using git withGitHub requires more initial steps.
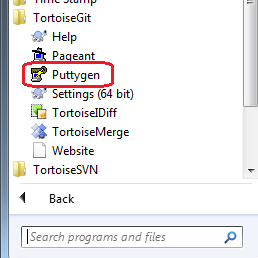
Generating SSH Keys. Before proceeding to Git operations we need to create SSH public and private keys, and register the public key on the GitHub site. In order to generate the keys we can use PuTTY Key Generator, which is already bundled with TortoiseGit fortunately. This program is called “Puttygen” and can be found in start-menu under TortoiseGit:
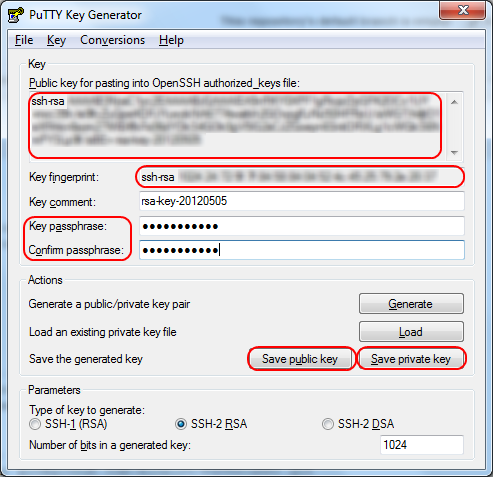
After running Puttygen you need to press “Generate”, and make some crazy mouse movements in the spotted area to provide some random data for the program (wow, what a brilliant idea). When finished you will have the public key generated. It is recommended that you provide a passphrase so that you would have a more secure private key. After that save your public and private keys using the 2 save buttons near the bottom of the window. But these are not all that you need to save! The public key format that GitHub and some other applications require you to provide is not the one that this program has saved for you. The topmost field which is labelled “Public key for passing into OpenSSH authorized_keys file” is the one that GitHub needs. It should be in one line (i.e., with no line-breaks), therefore we would refer to it later as the one-line-public-key. Please save the contents of this field and the next “key fingerprint” field somewhere for future references.
Registering SSH Keys in GitHub. Browse to GitHub, and go to your Account Seetings, and select SSH Keystherein. Press the Add SSH key button on the right. Provide a name for the key (I chose TortoiseGit), and paste the one-line-public-key in the Key field. Press Add Key. You may be prompted for your GitHub account password next. When finished, GitHub adds this key to its list of keys and provides a fingerprint. Make sure this fingerprint matches the key fingerprint that Puttygen created for you.
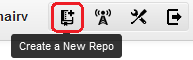
Creating a Repository in GitHub. Browse to the GitHub page and press the “Create a New Repo” button at the top of the page.
In the new form that appears, enter desired values for your project’s name and description. Currently there’s an option to add a README file or an appropriate .gitignore file to the repository. While making use of these options are recommended, in this tutorial I intend to start from a completely empty repository; therefore I unchecked those options. When finished press the “Create repository” button. With these steps I created a project called “PdfRenamer”.
Setting up TortoiseGit for the new project. After creating the repository, GitHub introduces some helpful basic commands to start working with the repository. We don’t intend to use the command-line, however this page contains useful information such as user-name and email with which GitHub recognizes you, and the git repository address, as highlighted below:
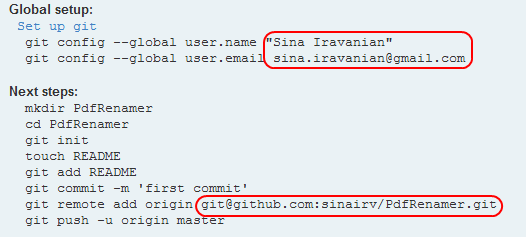
We need to do the following steps next:
- Right click somewhere in the Windows explorer window, and from the context-menu go to: TortoiseGit > Settings >> Git branch; and fill the user-name and email fields with the ones suggested by GitHub, and press OK.
- Create a folder preferably with the same name as your project (in my case PdfRenamer), and browse into it with Windows explorer.
- Right click somewhere in the folder and from the context menu select “Git Create repository here…”. A window pops-up. Make sure that “Make it Bare” is not checked; and press OK.
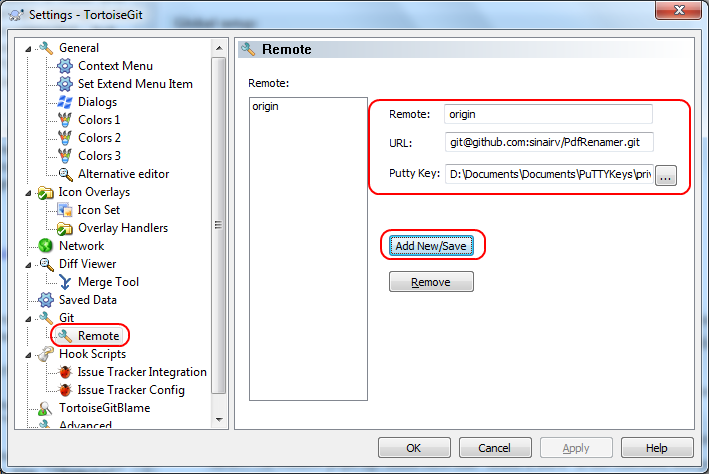
- Right click somewhere in the folder and from the context menu go to: TortoiseGit > Settings >> Git branch >> Remote sub-branch. In the “Remote” field enter “origin”, in the URL field enter the git repository address which was highlighted above and is in the form of
git@github.com:[username]/[projectname].git; and finally in front of “putty key” provide the address to the SSH private key which we saved earlier in this tutorial, and has the.ppkextension. When finished press the “Add New/Save” button. After that origin should be added to the list of Remotes.
Add files to the project structure. With git, adding a file to a project structure and having it reflected in the remote repository requires 3 operations: add, commit, and push. The first 2 operations are required for adding the file to the local repository, and the third one reflects the changes to the remote repository. This last operation can be postponed to a later time when you want to push a bundle of changes all at once.
To start, create a Readme.txt file in the root folder. Right click on the newly added file, from the context menu select: TortoiseGit > add; check the files to be added, and press OK. This was the first operation: add. In the new window press “commit …”, provide a meaningful commit message in the new window, and press OK when finished. This was the second operation: commit which reflects the changes to your local repository, the one in your hard-drive. You can push the changes in the next window if you want, however it’s not a good idea to push every local commit to the remote repository (that’s why we are using a DVCS after all).
Before continuing to the push command, let’s talk about some naming conventions in the Git world. With DVCSs such as git you can have different remote repositories which you may choose from to push your changes to. By convention, the default name for the remote repository is “origin”. In our case origin is the remote repository at the GitHub server, for which we manually added the link before. On the other hand, each project may have several branches. Conceptually a branch is another copy of the same project where other features are developed and tested. For example imagine that at a certain stage of development you may decide to add a new feature to your project. You may create a new branch called “test”, develop and test the feature there, and finally merge the changes with the code at the main branch. By convention, the main branch is called “master”.
When it comes to push, you need to know which branch of the code you want to push to which remote repository. In our simple case we want to push the master branch to the origin repository. For this purpose, right click somewhere on the Windows explorer that shows the project root folder, and select: TortoiseGit > Push…. Make sure the name of the branches for local and remote repositories and the name of the remote repository are selected correctly. More importantly make sure that the “Autoload Putty Key” check-box is also checked, and press OK. Next, the TortoiseGit will prompt you for the private-key passphrase. Note that this is not your GitHub account password, this is the passphrase that you chose when creating the private key with Puttygen. After finishing the push operation, check the sources in the project’s GitHub page to make sure the changes have been reflected there. Note that after the first push, the PuTTY authentication agent (Pageant) gets run in the background, so that you won’t need to enter the passphrase any time you want to push to GitHub.
Updating the local repository with the latest changes made by other team members to the remote repository. Well, there are two solutions. The one that I prefer is using git pull. You can easily find this command in the TortoiseGit’s context menu. The pull command, preserves the history of changes made by different people and makes a final merge afterwards. The other solution is git fetch and rebase. The fetch command only receives the latest changes from the remote repository but does not apply them. The rebase command first applies the remote changes to the repository, then applies your changes. Therefore it always seems that you have made the recent changes, while it may not be true. See this stackoverflow question for a better explanation.
Note: At any stage, if git complains about connecting through a null proxy, then you will have to remove proxy settings from the global .gitconfig file. For more information see tip 7 on my earlier post
You may also want to see my earlier post that describes using git with CodePlex on Windows.
