Using Git with CodePlex on Windows
If you’re new to Git and don’t know how to install Git on Windows, read my earlier post: How to Setup Git for Windows
On 21 March 2012, the CodePlex team announced their support for Git.
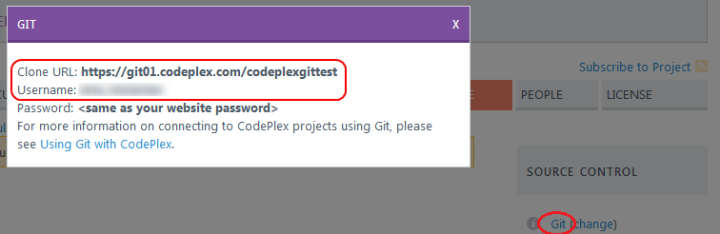
Creating a project with Git as source control is very easy in CodePlex and is done with a few clicks at no time. Suppose the project name is CodePlexGitTest. In order to make any changes to the project structure you need to clone the project first. This way you will have your own copy of the repository on your hard disk. To do this, the path to the git repository is needed. This can be obtained from the Source Code tab of the project’s CodePlex page, by pressing the Git link/button under “Source Control” section on the right pane, as seen below:
In order to clone the project, move to the folder that is going to host the project directory. Right click somewhere in the Windows explorer window and choose Git Clone. In the opened window set the “Url” field to the “Clone URL” value above, leave other options unchanged, and press OK. After prompting for your CodePlex user-name and password, it should now create the folder structure for your empty repository (Note: in case that git complains about connecting through a null proxy, then you will have to remove proxy settings from the global .gitconfig file. For more information see tip 7 on my earlier post).
Now that you have the currently empty project structure at your hard-drive, it’s time to add some files to it. Using git, adding a file to a project structure and having it reflected in the remote repository requires 3 operations: add, commit, and push. The first 2 operations are required for adding the file to the local repository, and the third one reflects the changes to the remote repository. This last operation can be postponed to a later time when you want to push a bundle of changes all at once.
To start, create a Readme.txt file in the root folder. Right click on the newly added file, from the context menu select: TortoiseGit > add; check the files to be added, and press OK. This was the first operation: add. In the new window press “commit …”, provide a meaningful commit message in the new window, and press OK when finished. This was the second operation: commit which reflects the changes to your local repository, the one in your hard-drive. You can push the changes in the next window if you want, however it’s not a good idea to push every local commit to the remote repository (that’s why we are using a DVCS after all).
Before continuing to the push command, let’s talk about some naming conventions in the git world. With DVCSs such as git you can have different remote repositories which you may choose from to push your changes to. By convention, the default name for the remote repository is “origin”. In our case origin is the remote repository at the CodePlex server. On the other hand, each project may have several branches. Conceptually a branch is another copy of the same project where other features are developed and tested. For example imagine that at a certain stage of development you may decide to add a new feature to your project. You may create a new branch called “test”, develop and test the feature there, and finally merge the changes with the code at the main branch. By convention, the main branch is called “master”.
When it comes to push, you need to know which branch of the code you want to push to which remote repository. In our simple case we want to push the master branch to the origin repository. For this purpose, right click somewhere on the Windows explorer that shows the project root folder, and select: TortoiseGit > Push…. Make sure the name of the branches for local and remote repositories and the name of the remote repository are selected correctly, and press OK. Enter CodePlex user-name and passwords which are prompted. Now check the sources in the project’s CodePlex site to make sure the changes have been reflected there.
How to update the local repository with the latest changes made by other team members to the remote repository? Well, there are two solutions. The one that I prefer is to use git pull. You can easily find this command in the TortoiseGit’s context menu. The pull command, preserves the history of changes made by different people and makes a final merge afterwards. The other solution is git fetch and rebase. The fetch command only receives the latest changes from the remote repository but does not apply them. The rebase command first applies the remote changes to the repository, then applies your changes. Therefore it always seems that you have made the recent changes, while it may not be true. See this stackoverflow question for a better explanation.
See also:
How to Setup Git for Windows
Using Git With GitHub on Windows
